OpenTimelineIO Movie Render Queue Setting - Unreal Engine 5 Release

General / 03 September 2023

The UnrealOTIOExporter is now available for UE5 here.

There has unfortunately been some regression in functionality with the port from Unreal 4 to Unreal 5.

Bug report Case # 00618138
The FMovieSceneExportMetadataShot objects in the FMovieSceneExportMetadata no longer contain MovieSceneShotSection info, the attribute it still there but it is a nullptr. This is due to the changes made here.
This means we no longer have any way of mapping which clip in the metadata corresponds to which section in the master sequence.

For now the functionality in the Unreal 5 version of the OTIO export setting mirrors the FCPXML plugin when the "OutputMetadata" option is selected. With exception that it lays out the clips sequentially on the timeline rather than stacked.

Additionally the plugin has now been split in two;

  • OpenTimelineIO
  • RenderQueueOtioOption 

So if you'd like to use the OpenTimelineIO portion you can simply only use that plugin and exclude the RenderQueueOtioOption. 
The OpenTimelineIO plugin contains the compiled libraries from the main branch up to commit hash eaf8569c1bdbea8bff568f063acb5318db9b7d15.

Updating a Plugin with Third-Party Library for UE5

General / 24 July 2023

I felt it was time to update my Movie Render Queue OpenTimelineIO Plugin for Unreal Engine 5, unfortunately this proved a little less straightforward than hoped so I decided to document the process here for future reference.

TLDR

  • Unreal Engine 5 has changed some class methods, and method signatures that need to be updated.
  • Unreal Engine 5 compiles using C++ 17 so if you use a third party library with dependencies that behave differently depending on the C++ version make sure to compile your library using C++ 17 to avoid linker errors.

First things first, I copied the plugin into an UE5 demo project, the demo project has a single demo C++ class - this C++ class is needed to generate the Visual Studio project files.

Then I tried to simply launch the project, the project prompted me that the Plugin was written in a different version of Unreal Engine so it needed to be recompiled. I clicked for it to be recompiled, alas no luck, it failed to compile so time to re-generate the visual studio project files and then open the project in Visual Studio (double click the sln file). In Visual Studio I tried to build it again (right click module name -> rebuild) to generate some more useful error messages.

Error    C2664    'void UMoviePipeline::ResolveFilenameFormatArguments(const FString &,const TMap> &,FString &,FMoviePipelineFormatArgs &,const FMoviePipelineFrameOutputState *,const int32) const': cannot convert argument 2 from 'FStringFormatNamedArguments' to 'const TMap> &'    UnrealOtioExporter    C:\Users\mvann\Documents\Unreal Projects\UnrealOtioExporter\Plugins\RenderQueueOtioOption\Source\RenderQueueOtioOption\Private\OtioMoviePipelineSetting.cpp    48

For the error it looks like an argument type changed in this method: In UE4 the ResolveFilenameFormatArguments method expects a second argument of type FStringFormatNamedArguments, but in UE5 that third argument is now of type TMap< FString, FString > as described in the docs.

That's a pretty straightforward fix:

Code updated, so let's try to compile again and see what new errors come up.

Error    LNK2019    unresolved external symbol "public: __cdecl opentimelineio::v1_0::Track::Track(class std::basic_string,class std::allocator > const &,class std::optional const &,class std::basic_string,class std::allocator > const &,class opentimelineio::v1_0::AnyDictionary const &)" (??0Track@v1_0@opentimelineio@@QEAA@AEBV?$basic_string@DU?$char_traits@D@std@@V?$allocator@D@2@@std@@AEBV?$optional@VTimeRange@v1_0@opentime@@@4@0AEBVAnyDictionary@12@@Z) referenced in function "protected: virtual void __cdecl UMoviePipelineOtioExporter::BeginExportImpl(void)" (?BeginExportImpl@UMoviePipelineOtioExporter@@MEAAXXZ)    UnrealOtioExporter    C:\Users\mvann\Documents\Unreal Projects\UnrealOtioExporter\Intermediate\ProjectFiles\Module.RenderQueueOtioOption.cpp.obj    1    


Error    LNK2019    unresolved external symbol "public: __cdecl opentimelineio::v1_0::Stack::Stack(class std::basic_string,class std::allocator > const &,class std::optional const &,class opentimelineio::v1_0::AnyDictionary const &,class std::vector > const &,class std::vector > const &)" (??0Stack@v1_0@opentimelineio@@QEAA@AEBV?$basic_string@DU?$char_traits@D@std@@V?$allocator@D@2@@std@@AEBV?$optional@VTimeRange@v1_0@opentime@@@4@AEBVAnyDictionary@12@AEBV?$vector@PEAVEffect@v1_0@opentimelineio@@V?$allocator@PEAVEffect@v1_0@opentimelineio@@@std@@@4@AEBV?$vector@PEAVMarker@v1_0@opentimelineio@@V?$allocator@PEAVMarker@v1_0@opentimelineio@@@std@@@4@@Z) referenced in function "protected: virtual void __cdecl UMoviePipelineOtioExporter::BeginExportImpl(void)" (?BeginExportImpl@UMoviePipelineOtioExporter@@MEAAXXZ)    UnrealOtioExporter    C:\Users\mvann\Documents\Unreal Projects\UnrealOtioExporter\Intermediate\ProjectFiles\Module.RenderQueueOtioOption.cpp.obj    1    


Error    LNK2019    unresolved external symbol "public: __cdecl opentimelineio::v1_0::Timeline::Timeline(class std::basic_string,class std::allocator > const &,class std::optional,class opentimelineio::v1_0::AnyDictionary const &)" (??0Timeline@v1_0@opentimelineio@@QEAA@AEBV?$basic_string@DU?$char_traits@D@std@@V?$allocator@D@2@@std@@V?$optional@VRationalTime@v1_0@opentime@@@4@AEBVAnyDictionary@12@@Z) referenced in function "protected: virtual void __cdecl UMoviePipelineOtioExporter::BeginExportImpl(void)" (?BeginExportImpl@UMoviePipelineOtioExporter@@MEAAXXZ)    UnrealOtioExporter    C:\Users\mvann\Documents\Unreal Projects\UnrealOtioExporter\Intermediate\ProjectFiles\Module.RenderQueueOtioOption.cpp.obj    1    


Error    LNK2019    unresolved external symbol "public: __cdecl opentimelineio::v1_0::Clip::Clip(class std::basic_string,class std::allocator > const &,class opentimelineio::v1_0::MediaReference *,class std::optional const &,class opentimelineio::v1_0::AnyDictionary const &)" (??0Clip@v1_0@opentimelineio@@QEAA@AEBV?$basic_string@DU?$char_traits@D@std@@V?$allocator@D@2@@std@@PEAVMediaReference@12@AEBV?$optional@VTimeRange@v1_0@opentime@@@4@AEBVAnyDictionary@12@@Z) referenced in function "protected: virtual void __cdecl UMoviePipelineOtioExporter::BeginExportImpl(void)" (?BeginExportImpl@UMoviePipelineOtioExporter@@MEAAXXZ)    UnrealOtioExporter    C:\Users\mvann\Documents\Unreal Projects\UnrealOtioExporter\Intermediate\ProjectFiles\Module.RenderQueueOtioOption.cpp.obj    1    


Error    LNK2019    unresolved external symbol "public: __cdecl opentimelineio::v1_0::ExternalReference::ExternalReference(class std::basic_string,class std::allocator > const &,class std::optional const &,class opentimelineio::v1_0::AnyDictionary const &)" (??0ExternalReference@v1_0@opentimelineio@@QEAA@AEBV?$basic_string@DU?$char_traits@D@std@@V?$allocator@D@2@@std@@AEBV?$optional@VTimeRange@v1_0@opentime@@@4@AEBVAnyDictionary@12@@Z) referenced in function "protected: virtual void __cdecl UMoviePipelineOtioExporter::BeginExportImpl(void)" (?BeginExportImpl@UMoviePipelineOtioExporter@@MEAAXXZ)    UnrealOtioExporter    C:\Users\mvann\Documents\Unreal Projects\UnrealOtioExporter\Intermediate\ProjectFiles\Module.RenderQueueOtioOption.cpp.obj    1    

So it got passed the compiler error, but now throws a bunch of linker errors... that's strange because these OpenTimelineIO libraries were working for UE4. As a sanity check I decided to pull the latest OpenTimelineIO code and rebuild the libraries. Then update all the headers, dll, and lib files in the UE5 project and finally try building the UE5 project again. Unfortunately that resulted in the exact same errors.

So my next course of action was to try to narrow down which line is causing the problem, by process of elimination (commenting out code) I found a problematic line which was the creation of the timeline object.

As a next step I decided to remove the importing of the opentimelineio library to see if I get the same error, this way I can eliminate whether the issue is that the entire library isn't getting linked or if it's just specific methods.

This resulted in many more linker errors, meaning the library did in fact link most of the methods correctly, there's just something about the creation of the timeline that's tripping it up. I spend a fair amount of time googling but without much result, then decided to leave it and came back to it the next day.

The next day I went back to the error message, what is it really telling me?

Error    LNK2019    unresolved external symbol "public: __cdecl opentimelineio::v1_0::Timeline::Timeline(class std::basic_string,class std::allocator > const &,class std::optional,class opentimelineio::v1_0::AnyDictionary const &)" (??0Timeline@v1_0@opentimelineio@@QEAA@AEBV?$basic_string@DU?$char_traits@D@std@@V?$allocator@D@2@@std@@V?$optional@VRationalTime@v1_0@opentime@@@4@AEBVAnyDictionary@12@@Z) referenced in function "protected: virtual void __cdecl UMoviePipelineOtioExporter::BeginExportImpl(void)" (?BeginExportImpl@UMoviePipelineOtioExporter@@MEAAXXZ)    UnrealOtioExporter    C:\Users\mvann\Documents\Unreal Projects\UnrealOtioExporter\Intermediate\ProjectFiles\Module.RenderQueueOtioOption.cpp.obj    1    

It's telling me that I'm using a method that it cannot find in the timeline.cpp.obj file, I copied the string it's using to find the method in the library.

??0Timeline@v1_0@opentimelineio@@QEAA@AEBV?$basic_string@DU?$char_traits@D@std@@V?$allocator@D@2@@std@@V?$optional@VRationalTime@v1_0@opentime@@@4@AEBVAnyDictionary@12@@Z

Then I opened the opentimeline.lib file (this is where the obj files during the linking process come from) and searched for the string; indeed I was unable to find it. However, I could see very similar methods, so I decided to delete characters until it found a match:

??0Timeline@v1_0@opentimelineio@@QEAA@AEBV?$basic_string@DU?$char_traits@D@std@@V?$allocator@D@2@@std@@V?$optional@VRationalTime@v1_0@opentime@@@optional_lite@nonstd@@AEBVAnyDictionary@12@@Z

Aha! So the lookup string is indeed slightly different, notably the optional_lite@nonstd bit here stands out. The timeline constructor uses the optional library, this is a dependency of opentimelineio and is included as an hpp file. I opened the hpp file in both projects, and there we have it: OpenTimelineIO does not use C++17 by default and thus optional_HAVE_STD_OPTIONAL is false, but the UE5 project does, so it ends up true there. This is what's resulting in the different lookup string between the library and the headers when called from the UE5 project.

Luckily there's a fairly simple fix for this; install OpenTimelineIO using C++ 17 so it creates a library which lookup strings will match the UE5 project. This can simply be done in the CMakeLists.txt file where I set CMAKE_CXX_STANDARD to 17, then use the cmakelists.txt file to re-install and generate the libraries.

I finally replaced the newly created lib and dll files in our UE5 poject, the project now compiles without errors!

Unfortunately it looks like a lot of the internals have changed between engines so will need to do some further cleanup to get the plugin's behaviour to be the same, I will update the repo when I finish it. (For example the MovieSceneShotSection potentially being a nullptr).

Creating a custom Movie Render Queue Setting for Unreal

Tutorial / 25 April 2021

Recently I’ve been working more with Unreal and decided to spend some time writing a plugin for the movie render queue that would output an otio file. OpenTimelineIO is the standard file format we use for cuts in editorial. An otio file contains information about clip order and length, with references to external media files.  The Movie Render Queue is a tool in unreal that allows you to queue up and render out Level Sequences from the engine.

Source code of my plugin: https://github.com/mvanneutigem/UnrealOtioExporter

This plugin is written in C++ because it currently isn’t possible to extend the Movie Render Queue in Unreal using the python API, at least as far as I’m aware. This meant I had to use the C++ API of OpenTimelineIO as well, which proved a bit tricky since at the time there weren't really any examples floating around, resulting in a bit of trial and error on my end.

Getting started

To be able to develop for Unreal Engine you will need to install the latest version of the engine (or at least 4.25+, as this is where the Movie Render Queue was introduced). You will also need visual studio, you can get visual studio community for free. Once these are installed you can create a new project, you don’t need the starter content, but you will need to enable to movie render queue plugin. 

Now, the easiest way to get started with writing C++ code is to open up the project in Unreal and go to the “File” menu and select “New C++ class”. Next you can select a class to inherit from, in my case I wanted to inherit from the “UMoviePipelineOutputBase” class, which is a subclass of the "UMoviePipelineSetting". You should now have a new folder under your main project folder called "Source".
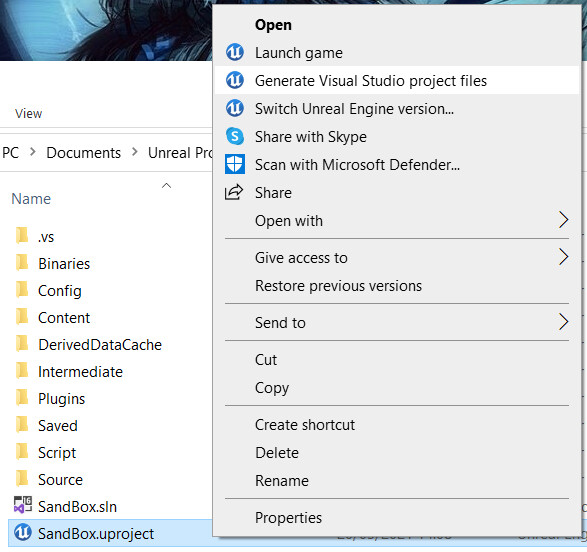
But before you start coding you will want to generate the visual studio project files to have an easier time compiling:


You can do this by right clicking the .uproject file, or from the commandline like so;

"<AbsoluteEnginePath>Binaries\DotNET\UnrealBuildTool.exe" -projectfiles -project="<FullPathToUprojectFile>" -game -rocket -progress 

Now you should have an .sln file you can double click to open the project in visual studio.

Inside of the "Source" folder you should find two target .cs files (we can skip those for now), and another folder. This folder should be named the same as your project, this is your main module. When you open up this folder you will find the C++ class you created (It may be inside the private/public folders depending on what you selected when you created the class). There should also be a build.cs file here. 

The build.cs file is used to add dependencies to your module. Any modules you want to use in your code should be listed here, else you will run into trouble during compilation;

PublicDependencyModuleNames.AddRange(
            new string[]
            {
                "Core",
                "Projects",
                "MovieRenderPipelineCore",
                "MovieSceneTools",
                "MovieSceneTracks",
                "LevelSequence",
                "MovieScene",
                "opentimelineio",
                // ... add other public dependencies that you statically link with here ...
            }
);

 If you go back up to the main project folder and open up your main .uproject file you will find there is now an entry for the main project module listed in there as well. This will tell unreal what modules and plugins to load into your project.

Implementing the setting

To create a custom setting for the Movie Render Queue you have to inherit from a class called the UMoviePipelineSetting (or any of it's subclasses).

https://docs.unrealengine.com/en-US/API/Plugins/MovieRenderPipelineCore/UMoviePipelineSetting/index.html

Next you will have to implement at least the base functions, these will tell Unreal whether the setting will be valid to execute on individual level sequences (Shots) and/or "Master" Level Sequences (Sequences). You can do this directly in the header as they return simple booleans.

protected:
    virtual bool IsValidOnShots() const override { return false; }
    virtual bool IsValidOnMaster() const override { return true; }

Now you can add the logic you want your setting to execute, this logic should live in the "BeginExportImpl()" function, which you can override in the header;

virtual void BeginExportImpl() override; 

And you can add the actual implementation of the function in the cpp file, for a simple test you can log something to the output to make sure the function is actually getting run before you start adding any complex logic.

void UMoviePipelineOtioExporter::BeginExportImpl()
{
    UE_LOG(LogMovieRenderPipeline, Log, TEXT("Running OtioMoviePipelineSetting OTIO export"));
}

Now  you can compile your code, you can either do this by simply clicking the compile button above the viewport in unreal. Or by browsing to your module from the "Windows->Developer Tools->Modules" panel and clicking compile. Or alternatively running the project from inside visual studio, which has the added benefit of attaching the visual studio debugger as well. 

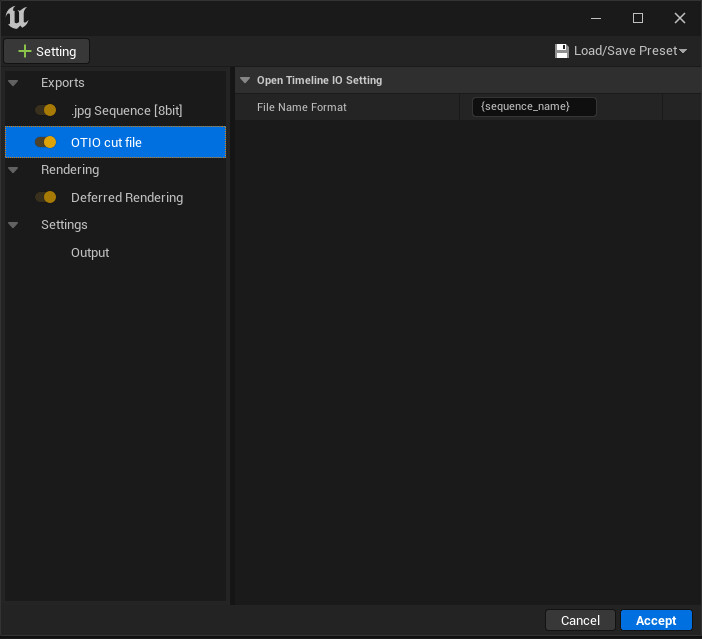
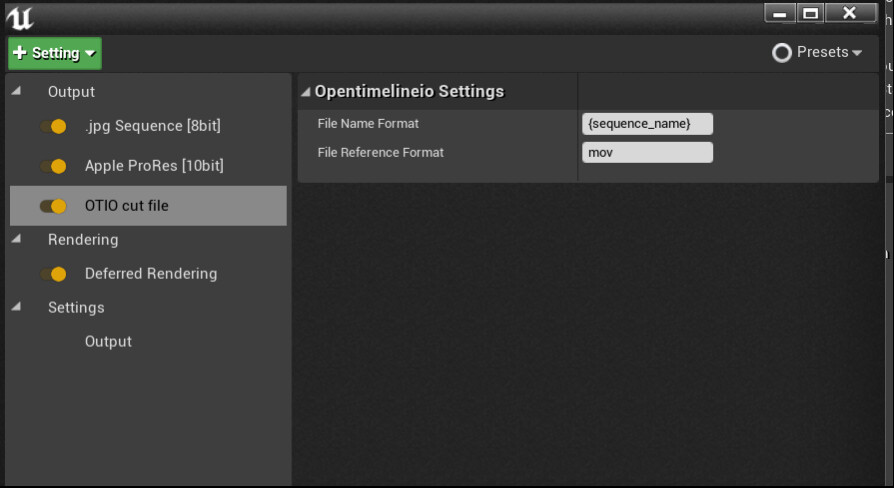
When your code has compiled successfully the option should become available for you to use in the movie render queue. Open the Movie Render Queue dialog from the "windows" menu, next add a level sequence and click the preset which will bring up another window. Then click "+ Setting" and it should be listed there. 

To see the output, you will need to bring up the output window which you can find under "Windows->Developer tools->output log". 

Note: You can also use the output log to test your python code, when you click the "cmd" button in the lower left corner it will switch to python and allow you to directly execute your python commands in the editor.

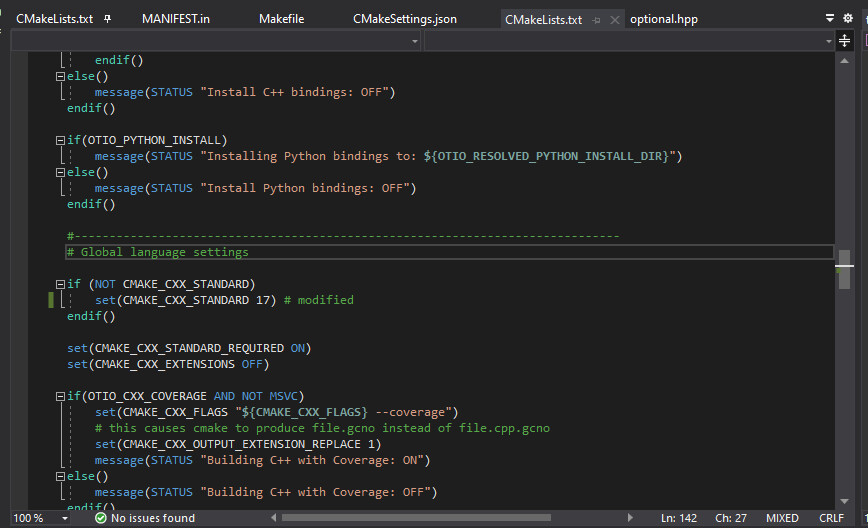
To expose settings in the GUI of your newly created setting you need to declare them as variables in your setting's header file. You can also specify a category for each property, this can be any string and is used to bundle settings together visually.

UPROPERTY(EditAnywhere, BlueprintReadWrite, Category = "Opentimelineio settings")
    FString FileNameFormat;
UPROPERTY(EditAnywhere, BlueprintReadWrite, Category = "Opentimelineio settings")
    FString FileReferenceFormat = "jpeg";

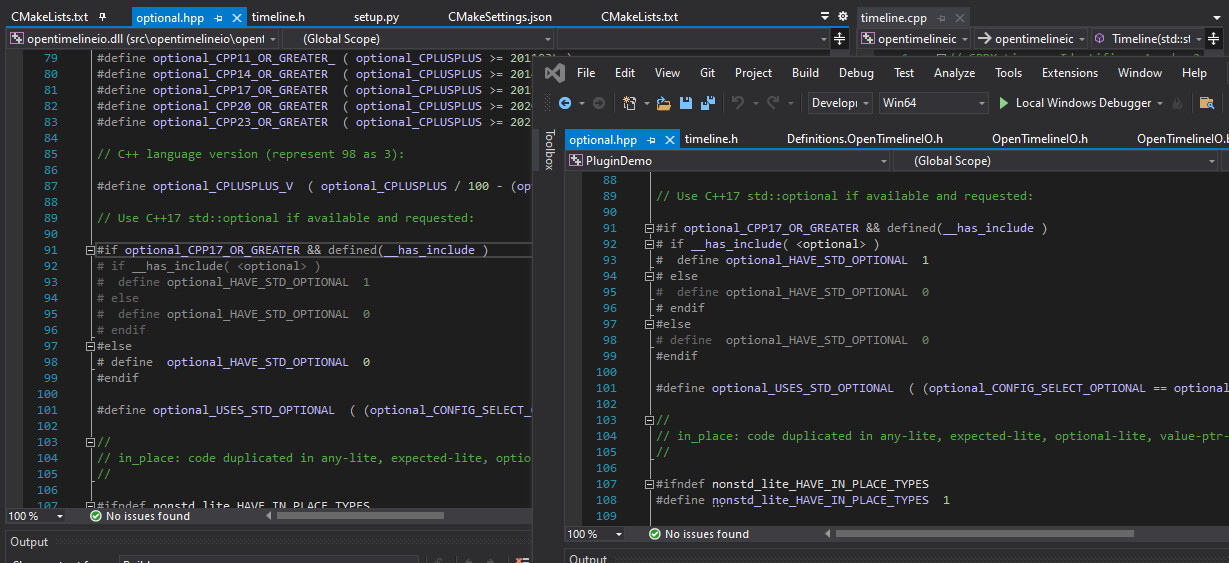
Including third party code

To include third party code, you can either include the entire source code, or you can compile your cpp files into a library. In this case I did the latter. You can use visual studio to do this, opentimelineio comes with a make file you can right click, all you need to do is specify the target (in my case windows x64) and it will generate the dll's, lib's and headers.

If you are wanting to create a plugin you can get an example of the structure by creating a new plugin from the "Plugins" dialog and selecting the "third party" option.

To start from scratch you should add the new module as an entry in your uproject (or uplugin) file, the name specified here should match what you named the module folder and class files, "opentimelineio" in my case.

 "Modules": [
    {
      "Name": "RenderQueueOtioOption",
      "Type": "Runtime",
      "LoadingPhase": "Default",
      "WhitelistPlatforms": [
        "Win64"
      ]
    },
    {
      "Name": "opentimelineio",
      "Type": "Runtime",
      "LoadingPhase": "Default",
      "WhitelistPlatforms": [
        "Win64"
      ]
    }
  ],

Once you have compiled your third party code you can create a new folder called "thirdparty" in your Source folder, and underneath it replicate the folder structure as was present in the main module that unreal created for you. It should have a folder containing a build.cs file, a header and cpp file for your module, and all the third party files you wish to include (headers, lib's, dll's).

In the build.cs file you should specify the locations of your header files.

PublicIncludePaths.AddRange(
    new string[] {
        // ... add public include paths required here ...
        "$(PluginDir)/Source/ThirdParty/opentimelineio/include",
        "$(PluginDir)/Source/ThirdParty/opentimelineio/include/opentimelineio/deps",
    }
);

As well as adding the dll's and lib's as dependencies, these are specific to your target platform so we have to check this matches.

if (Target.Platform == UnrealTargetPlatform.Win64)
{
    // Add the import library
    PublicAdditionalLibraries.Add("$(PluginDir)/Source/ThirdParty/opentimelineio/opentimelineio.lib");
    PublicAdditionalLibraries.Add("$(PluginDir)/Source/ThirdParty/opentimelineio/opentime.lib");

    // Delay-load the DLL, so we can load it from the right place first
    PublicDelayLoadDLLs.Add("opentimelineio.dll");
    PublicDelayLoadDLLs.Add("opentime.dll");

    // Ensure that the DLL is staged along with the executable
    RuntimeDependencies.Add("$(PluginDir)/Source/ThirdParty/opentimelineio/opentimelineio.dll");
    RuntimeDependencies.Add("$(PluginDir)/Source/ThirdParty/opentimelineio/opentime.dll");
}

Next we should fill out the header and cpp file for your third party module, to actually load the third party code library. This can be fairly minimal, just a basic class inheriting from the IModuleInterface with a variable to store the library handle.

#pragma once
#include "Modules/ModuleManager.h"

class FopentimelineioModule : public IModuleInterface
{
public:
    /** IModuleInterface implementation */
    virtual void StartupModule() override;
    virtual void ShutdownModule() override;
private:
    /** Handle to the test dll we will load */
    void*    ExampleLibraryHandle;
};

In the cpp file of this third party module you can try to load the library and create a popup if it failed. You can do this in the StartupModule function.

ExampleLibraryHandle = !LibraryPath.IsEmpty() ? FPlatformProcess::GetDllHandle(*LibraryPath) : nullptr;
if (!ExampleLibraryHandle)
{
    FMessageDialog::Open(EAppMsgType::Ok, LOCTEXT("ThirdPartyLibraryError", "Failed to load otio library"));
}

Dont forget to free up the memory in the ShutdownModule function.

 FPlatformProcess::FreeDllHandle(ExampleLibraryHandle);

You should now be able to use the third party library in your main module's code (don't forget to add the newly created module as a dependency in your main modules build.cs file!).

OpenTimelineIO

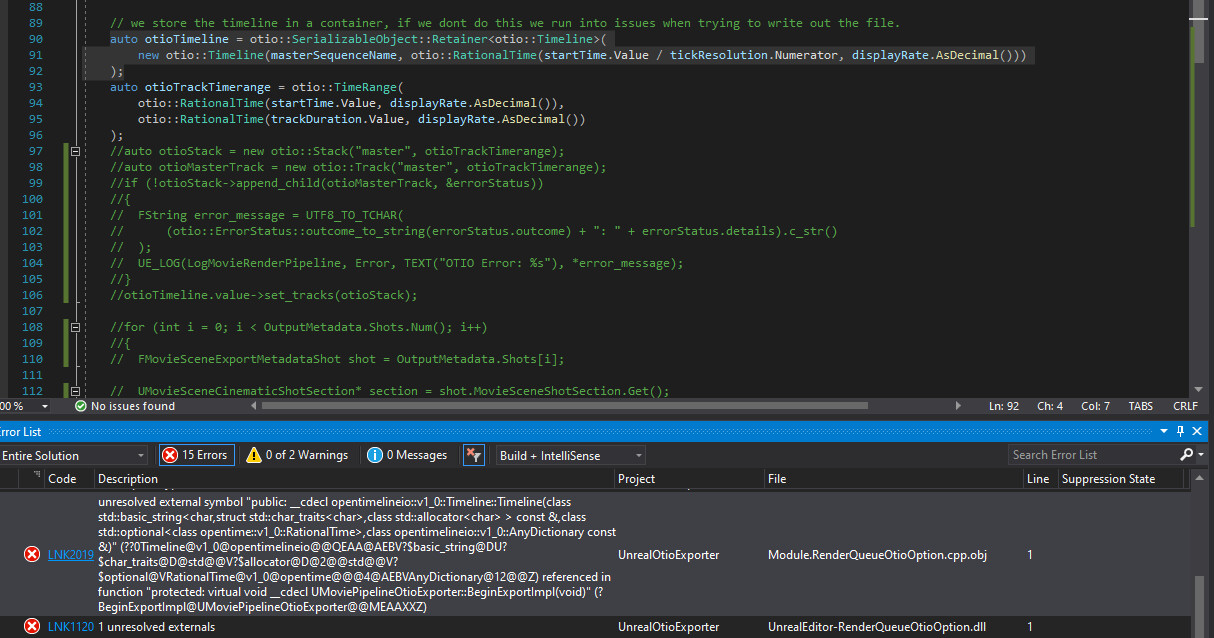
As mentioned before, the opentimelineio C++ api was a bit tricky for me to use. The main thing that tripped me up was the way memory is managed in opentimelineio, you're required to make use of so called  "Retainer" objects to hold your objects. These retainer objects will make sure that your objects don't get deleted until you take back ownership of them for clean up.

// we store the timeline in a container, if we dont do this we run into issues when trying to write out the file.
auto otioTimeline = otio::SerializableObject::Retainer<otio::Timeline>(
    new otio::Timeline(
        masterSequenceName, 
        otio::RationalTime(startTime.Value / tickResolution.Numerator, displayRate.AsDecimal())
    )
);

 If you don't make use of the retainer object you will run into heap memory error's as the objects get deleted twice when you try to write it out to a file. Once by opentimelineio, and once by the unreal garbage collection it seems.

otio::ErrorStatus errorStatus;
if (!otioTimeline.value->to_json_file(otioFilePathStr, &errorStatus))
{
    FString errorMessage = UTF8_TO_TCHAR(
        (otio::ErrorStatus::outcome_to_string(errorStatus.outcome) + ": " + errorStatus.details).c_str()
    );
    UE_LOG(LogMovieRenderPipeline, Error, TEXT("OTIO Error: %s"), *errorMessage);
}

At the end of the function you should call "take_value" on the retainer object to take back ownership of it, which removed the crashing for me.

otio::Timeline* timeline = otioTimeline.take_value(); 

Additional docs

Movie Render Queue: https://docs.unrealengine.com/en-US/RenderingAndGraphics/RayTracing/MovieRenderQueue/index.html
OpenTimelineIO: https://github.com/PixarAnimationStudios/OpenTimelineIO

Lastly I just wanted to mention I'm still learning every day so if you notice any mistakes let me know!

Using OpenMaya for applying transformations to animated objects while maintaining sparse curves

Work In Progress / 24 June 2020

Been doing some research on methods to apply spatial transformations to animated objects.
The main problem I was trying to solve here is how to offset animated transforms while maintaining sparse curves - the obvious solution is to add another transform as a parent and simply offset that but I was curious if there was a way to do it directly on the animated transform.
The resulting tool is still work-in-progress but I wanted to get the first version out there and see if people may have suggestions for improvements.

I chose to approach this using OpenMaya for speed reasons, using the cmds library works as well but doesn't allow you to query values using a time context, rather having to set the currentTime which is much, much slower.

time_context = OpenMaya.MDGContext(OpenMaya.MTime(frame))
matrix_object = plug.asMObject(time_context)
fn_matrix_data = OpenMaya.MFnMatrixData(matrix_object)
matrix = fn_matrix_data.matrix()
Another benefit is being able to directly manipulate animation curves, for animated objects.
m_plug = m_dag_node.findPlug(attribute, False)
m_source = m_plug.source()
if m_source.isNull:
    return
m_source_node = m_source.node()
if not m_source_node.apiTypeStr.startswith('kAnimCurve'):
    return
fn_curve = OpenMayaAnim.MFnAnimCurve(m_source_node)
fn_curve.addKey(OpenMaya.MTime(input), value)

The main outstanding issue are the that it doesn't account for rotation order changes and the way it handles rotations over the 180 degree threshold, it's internally using matrices so this information gets lost during calculations. I've implemented an experimental flipping filter that works quite well but I'm continuing to do research on how to improve it when I have some time.

Full code available on my github: https://github.com/mvanneutigem/maya_tools

Writing a basic deformer for Maya in python

Tutorial / 26 May 2020

This tutorial functions as a starting point and to give some basic pointers on how to approach writing a deformer for Maya, I've based this on the mnCollisionDeformer I recently wrote, the video will cover the basic idea but will leave room for you to implement your own algorithm.

You can find the deformer template to get started from here: https://github.com/mvn882/tutorials/blob/master/plugins/deformerTemplate.py 

You can start from the template this already has the basic functions and class for the deformer set up.
It starts with the imports, we want to import OpenMaya and OpenMayaMPX from the old python API, the newer API does not support MPxDeformerNode's yet. We also want to import Mel eval, this will be used for evaluating custom attribute editor templates.

import maya.OpenMaya as OpenMaya
import maya.OpenMayaMPx as OpenMayaMPx
from maya.mel import eval as mel_eval

Then we'll set a couple of global variables, these are pre-defined in Maya to access geometry data and will work from 2016 upwards.
Sidenote: the MPxDeformerNode inherits from the MPxGeopmetryFilter base class, hence that's what the variables are called.

kInput = OpenMayaMPx.cvar.MPxGeometryFilter_input
kInputGeom = OpenMayaMPx.cvar.MPxGeometryFilter_inputGeom
kOutputGeom = OpenMayaMPx.cvar.MPxGeometryFilter_outputGeom
kEnvelope = OpenMayaMPx.cvar.MPxGeometryFilter_envelope
kGroupId = OpenMayaMPx.cvar.MPxGeometryFilter_groupId

Now we'll define the actual class, this will inherit from the MPxDeformerNode as this is a simple deformer.

class deformer(OpenMayaMPx.MPxDeformerNode):
    def __init__(self):
        OpenMayaMPx.MPxDeformerNode.__init__(self)

You will have to set a type id and a type name to be used in the initializePlugin method.

type_id = OpenMaya.MTypeId(0x00001)  
type_name = "deformer"

The initalizePlugin method also needs a creator and an initalize method so we'll define these as well.
The creator should be a clas method as it does not use any instance data and will need to be callable without a class instance, this method will simply return a new instance of the class.

@classmethod
def creator(cls):
    return cls()

The initialize method is where we create all the attributes that we want the deformer to have as inputs and outputs, for a collision deformer you'll want to at least have a collider mesh as an input.

@classmethod
def initialize(cls):
    generic_attr_fn = OpenMaya.MFnGenericAttribute()
    cls.collider_attr = generic_attr_fn.create('collider', 'cl')
    generic_attr_fn.addDataAccept( OpenMaya.MFnData.kMesh )
    cls.addAttribute( cls.collider_attr )

This is also where you would define dependencies between in and outputs, so that when an input is changed the corresponding output will be recomputed.

cls.attributeAffects( cls.collider_attr, kOutputGeom )

Now you can add the initializePlugin and uninitializePlugin methods, outside of the class.
The initializePlugin is simply used to register the plugin in Maya, this is also where you set the author and version of the plugin and load any custom Attribute Editor templates.

def initializePlugin(plugin):
    plugin_fn = OpenMayaMPx.MFnPlugin(plugin, "Marieke van Neutigem", "0.0.1")
    plugin_fn.registerNode(
            deformer.type_name,
            deformer.type_id,
            deformer.creator,
            deformer.initialize,
            OpenMayaMPx.MPxNode.kDeformerNode
        )
    mel_eval( gui_template )

The uninitializePlugin method simply deregisters the plugin using the plugin id when the plugin is unloaded from maya.

def uninitializePlugin(plugin):
    plugin_fn = OpenMayaMPx.MFnPlugin(plugin)
    plugin_fn.deregisterNode(deformer.type_id)

Now you can start implementing the deform method, you could implement the compute method instead as you would on a basic deformer but really I recommend only doing that if the deformation is not a simple per vertex operation and requires you to use compute instead.

The deform method gives you access to the data_block, this can be used to retrieve the values of any of the attributes you added to your plugin. You also have a geometry_iterator, this can be used to iterate over all the vertices of the input geometry and modify them on the fly.
Then there's the local to world space matrix that you can use to transform the vertices from the input mesh to world space for any calculations that require that. And lastly, there is the geometry index which is needed to access to the input geometry from the global geometry filter variables.

def deform(self, data_block, geometry_iterator, local_to_world_matrix, geometry_index):

After you've implemented the deform method there's one last thing; you can add a custom attribute editor template. This is useful if you have added some attributes to your plugin but they don't show the way you would want them to. This is a simple Mel script that needs to be evaluated on loading the plugin, the proc has to be named AE[Name of your deformer]Template.

gui_template = """global proc AEdeformerTemplate( string $nodeName )
    {
        editorTemplate -beginScrollLayout;
            editorTemplate -beginLayout "Deformer Attributes" -collapse 0;
                // Add your own attributes here in the way you want them to be displayed.
            editorTemplate -endLayout;
            AEdependNodeTemplate $nodeName;
            editorTemplate -addExtraControls;
        editorTemplate -endScrollLayout;
    }"""

I hope that get's you a bit of a starting point to start writing your own deformers!

You can find the full source code for the mnCollisionDeformer here for reference: https://github.com/mvanneutigem/tutorials/blob/master/plugins/mnCollisionDeformer.py 

mnCollisionDeformer; a collision deformer for Maya.

Work In Progress / 23 May 2020

A collision deformer I'm writing for learning purposes in my spare time.
Not very performant at the minute as it's written in Python and I came up with my own logic rather than using an established algorithm, this also means it's got some issues with edge-cases, but a very good learning exercise.


I will be releasing the code and a tutorial on how to approach something like this when I find some time for code clean up.

Writing a basic maya plugin in python

Tutorial / 17 May 2020

I've been working from home for the last few weeks and with the extra time on my hands, I figured I'd try my hand at creating a tutorial for one of the things that may seem a bit more daunting to get started on; writing Maya plugins.

This is a very basic tutorial going over how to create a simple plugin and should allow you to take what you need from it to start creating your own plugins.

You can find the code from this tutorial on my Github: https://github.com/mvanneutigem/tutorials/blob/master/plugins/demoNode.py